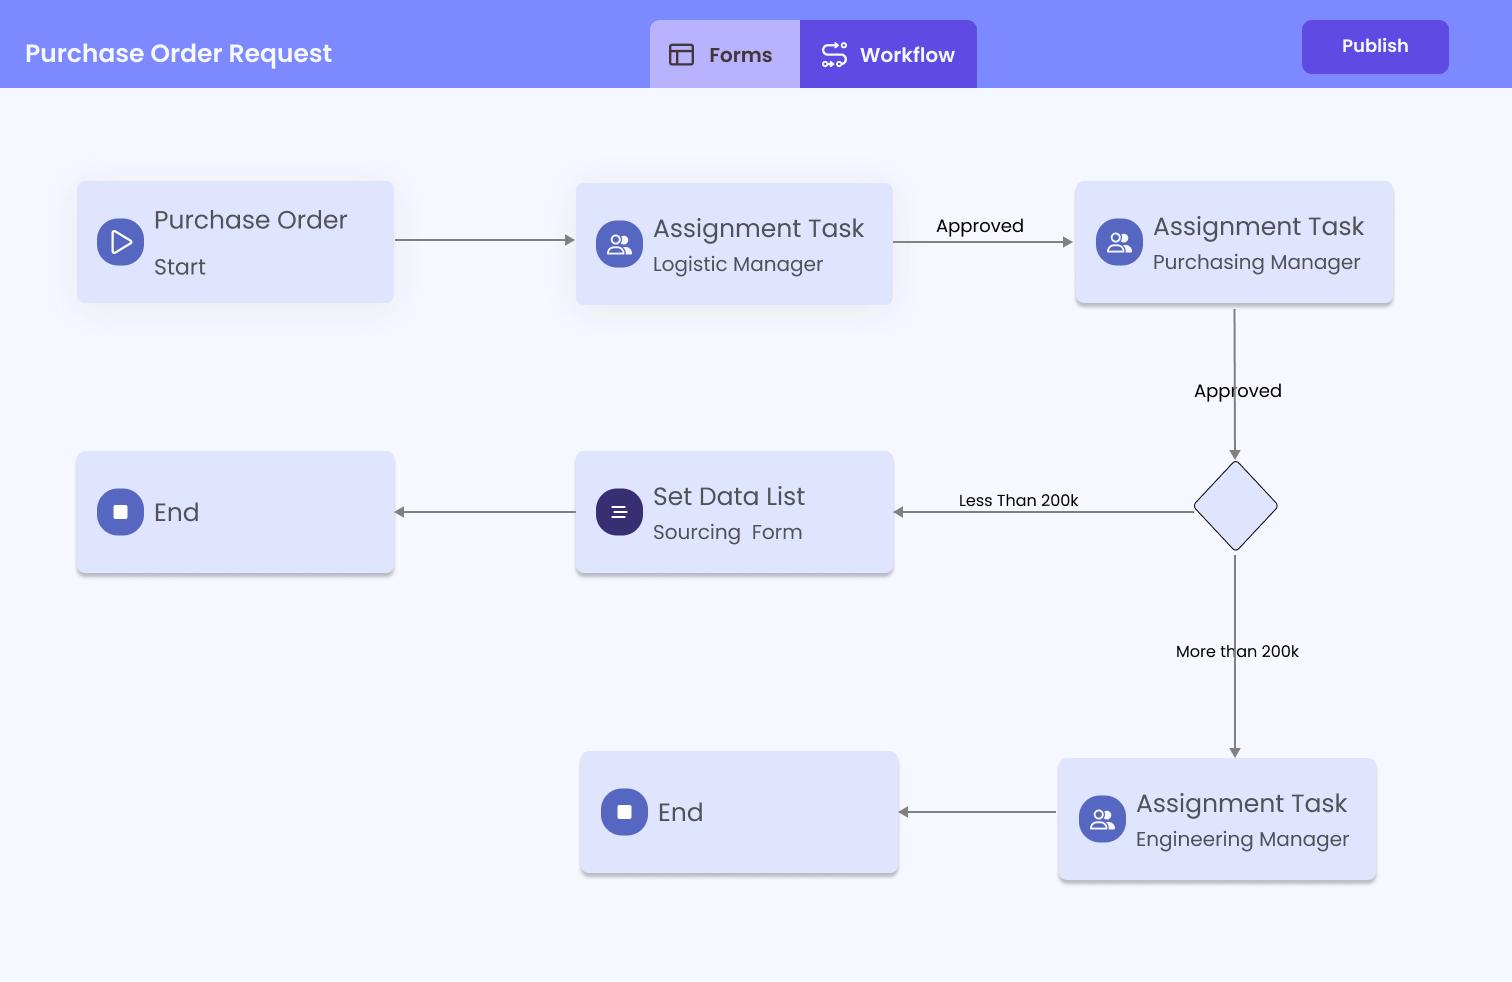
In the quest for operational excellence, businesses continuously seek ways to improve efficiency, reduce costs, and enhance productivity. At the heart of this pursuit lies the concept of efficient workflows—streamlined processes that minimize manual effort, reduce errors, and ensure smooth operations across various departments. Implementing efficient workflows is more than a strategic advantage; it's a necessity in today's fast-paced business environment.
Yeeflow emerges as a powerful ally in this context, offering a dynamic platform designed to simplify the creation and management of custom workflows. Whether you aim to automate HR processes, streamline finance operations, enhance sales activities, or optimize project management, Yeeflow provides the tools and flexibility needed to design workflows that meet your specific requirements.
This article will guide you through the essentials of creating efficient workflows using the Yeeflow platform. You'll learn about:
- The importance of efficiency in workflow design and its impact on business operations.
- Getting started with Yeeflow, including a walkthrough of its intuitive platform and key features.
- A step-by-step guide to designing your first workflow, tailored to your operational needs.
- Leveraging advanced features and best practices to ensure your workflows deliver maximum efficiency and results.
Adopting efficient workflows with Yeeflow not only streamlines your business processes but also unlocks new opportunities for innovation and growth. Let’s explore the transformative potential of Yeeflow and how it can elevate your business to new heights of efficiency and productivity.
Understanding Yeeflow's Platform
At the core of any successful workflow automation initiative is a powerful, versatile platform that not only simplifies the creation of workflows but also makes them smart, adaptable, and capable of driving significant improvements in efficiency. Yeeflow stands out in this regard, offering a comprehensive suite of features designed to cater to the diverse needs of modern businesses. Here’s what makes Yeeflow an invaluable tool for creating efficient workflows:
Key Features Supporting Efficient Workflow Creation
- Visual Workflow Builder: Yeeflow’s intuitive drag-and-drop interface allows users to easily design workflows. This visual approach simplifies the process of mapping out each step, from triggers and actions to conditions, without requiring advanced technical skills.
- Custom Forms and Fields: At the heart of every workflow are the data inputs and outputs. Yeeflow enables the creation of custom forms with a wide range of field types, ensuring that data collection is both structured and streamlined.
- Workflow Automation Rules: With Yeeflow, you can set up complex rules that trigger specific actions within your workflows. These rules can be based on various conditions, enabling automated decision-making that enhances efficiency.
- Integration Capabilities: Yeeflow’s ability to integrate with a plethora of other tools and systems means that your workflows can seamlessly connect with your existing tech stack. This ensures a unified ecosystem where data flows smoothly between applications.
- Access Control and Permissions: Efficient workflows also mean secure workflows. Yeeflow provides robust access control and permissions settings, ensuring that sensitive data is protected and that workflows are executed by authorized personnel only.
- Analytics and Reporting: Understanding the effectiveness of your workflows is key to continuous improvement. Yeeflow offers detailed analytics and reporting features, giving you insights into performance metrics and areas for optimization.
The Impact of Yeeflow on Business Operations
Implementing workflows with Yeeflow can have a transformative effect on your business operations. By automating routine tasks, you reduce manual labor and free up your team to focus on more strategic activities. This not only boosts productivity but also improves job satisfaction as employees engage in more meaningful work. Moreover, with reduced errors and increased speed, your business can deliver higher quality services, enhancing customer satisfaction and competitive advantage.
In the following sections, we will guide you through the steps of getting started with Yeeflow, from signing up and setting up to creating and optimizing your first workflow. Whether you’re new to workflow automation or looking to enhance your current processes, Yeeflow provides the flexibility and power needed to achieve your operational goals.
Getting Started with Yeeflow
Embarking on your journey to workflow automation with Yeeflow begins with a few straightforward steps. From signing up to navigating the Yeeflow dashboard, we'll ensure you have all the information you need to start designing your efficient workflows.
Sign Up and Setup
Step 1: Sign Up for Yeeflow
- Visit the Yeeflow website (www.yeeflow.com) and click on the "Sign Up" button.
- Fill in the required details, such as your name, email address, and company information, to create your account.
- Once you've signed up, you'll receive an email to verify your account. Follow the link to activate your Yeeflow account.
Step 2: Initial Setup
- After logging in, you'll be directed to the Yeeflow main page.
- You can create an application, using template or start from scratch to begin your yeeflow time.
Understanding Yeeflow's Workflow Elements
To effectively use Yeeflow, it's essential to familiarize yourself with its core workflow components. These elements are the building blocks of your automation process:
- Triggers: The events that initiate your workflow. Triggers can be anything from a new form submission to a specific date/time or an update in a connected system.
- Actions: The tasks carried out when a trigger occurs. Actions can range from sending emails, updating records, to creating tasks in project management tools.
- Conditions: Logical rules that determine the path of a workflow. Conditions can direct different actions based on specific criteria being met.

Navigating the Visual Workflow Builder
Yeeflow’s visual workflow builder is designed for ease of use. Here’s how to access and start using it:
- Add the new application, select “Create New Component”, choose "Approval form" or "Data list", you can pick the "Edit in Designer".
- You’ll be taken to the visual builder, where you can drag and drop elements to design your workflow.
- Start by adding a trigger, then connect actions and conditions to build out the process flow.
Tips for Your First Workflow
- Begin Simple: Start with a basic workflow to get a feel for the design process. This could be something as simple as an automated email response to a form submission.
- Use Templates: Yeeflow offers a variety of templates for common workflows across different departments. These can be a great starting point for your first project.
By following these initial steps, you’re well on your way to unlocking the full potential of workflow automation with Yeeflow. As you become more comfortable with the platform, you can start exploring more complex workflows and taking advantage of Yeeflow's advanced features.
In the next section, we'll guide you through creating your first workflow in Yeeflow, providing a step-by-step approach to ensure success.
Creating Your First Workflow
With Yeeflow, creating a workflow that enhances efficiency across your business operations is both straightforward and customizable. Follow these steps to build a workflow that meets your specific needs, ensuring a smooth automation process from start to finish.
Step 1: Define Your Workflow Objective
Before diving into the workflow builder, it's crucial to clearly define what you aim to achieve. A well-defined objective guides the design of your workflow and helps in measuring its success.
- Identify the Problem: Understand the issue or process you're looking to automate. Is it to reduce manual data entry, speed up response times, or something else?
- Set Clear Goals: What does success look like for this workflow? Perhaps it's reducing process time by 50% or eliminating data entry errors.
Step 2: Mapping Out Your Process
A clear map of your process ensures that no steps are missed and helps in identifying potential bottlenecks.
- Outline Each Step: Start by documenting each step of the process as it exists currently, including who is responsible and what actions they take.
- Identify Opportunities for Automation: Look for repetitive tasks, delays, or manual interventions that could be automated for efficiency.
Step 3: Customizing Workflow Components
With a process map in hand and a clear objective, you’re ready to start building in Yeeflow.
- Selecting Triggers: Choose what will start your workflow. This could be a new form submission, a scheduled time, or an action in another system.
- Designing Actions: Add actions your workflow will perform, like sending an email, updating a database, or creating a task in a project management tool.
- Implementing Conditions: Use conditions to create decision points in your workflow, directing it based on data or actions taken.
Utilizing Yeeflow's Visual Workflow Builder
- Access the workflow builder from the dashboard by selecting “Create Workflow.”
- Use the drag-and-drop interface to assemble your workflow. Start with your trigger, then connect your actions and conditions based on the process map you’ve outlined.
- Customize each component by selecting it and configuring its settings according to your needs.
Tips for Effective Workflow Design
- Keep it Simple: Start with a basic version of your workflow and expand as you get more comfortable with the tool.
- Test Thoroughly: Before full implementation, test your workflow with a small group to ensure it functions as intended.
- Gather Feedback: Use feedback from the test phase to refine and improve your workflow for better efficiency.
By following these steps, you can create a tailored workflow in Yeeflow that not only meets your immediate objectives but is also scalable for future needs. The flexibility and power of Yeeflow ensure that as your business grows and changes, your workflows can easily adapt.
In the next section, we will delve into the advanced features of Yeeflow and explore best practices for optimizing your workflows for maximum efficiency and impact.
Advanced Workflow Features and Optimization
Yeeflow isn’t just about creating simple, linear workflows; it’s designed to support complex process automations with advanced features that cater to nuanced business requirements. Here’s how you can leverage these capabilities to enhance and optimize your workflows:
Integration with Other Tools
Integrating Yeeflow with your existing tools and systems can significantly amplify your workflow’s efficiency by ensuring a seamless flow of information across platforms.
- API Integrations: Connect Yeeflow with hundreds of other applications through API integrations, enabling data to move automatically between systems without manual intervention.
- Webhooks: Use webhooks to trigger workflows in Yeeflow based on events in other services, expanding the scope of automation beyond the Yeeflow ecosystem.
Utilizing Data and Analytics
Data-driven insights can be a goldmine for optimizing your workflows. Yeeflow’s analytics features enable you to monitor performance and identify areas for improvement.
- Tracking Key Metrics: Monitor how long tasks take to complete, where bottlenecks occur, and the overall effectiveness of the workflow.
- Iterative Improvement: Use data insights to make informed adjustments to your workflows, refining processes to achieve better results over time.
Best Practices for Workflow Creation with Yeeflow
To maximize the benefits of Yeeflow and ensure your workflows are both efficient and scalable, consider these best practices:
- Regularly Review and Refine: Business processes and needs evolve; regularly review your workflows to ensure they remain aligned with your objectives.
- Focus on User Experience: Design workflows with the end-user in mind. Simplify tasks and ensure the workflow logic is intuitive and straightforward.
- Embrace Scalability: Build workflows that can easily be adjusted or expanded as your business grows. This includes using variables and conditions that accommodate changes in volume, complexity, or scope.
- Leverage Community and Support: Take advantage of Yeeflow’s community forums and support resources. Sharing experiences and solutions with other users can provide new insights and ideas for optimizing your workflows.
Real-World Examples: Seeing Yeeflow in Action
To illustrate these concepts, consider exploring case studies or success stories available on Yeeflow’s website. These examples can provide practical insights into how various businesses have effectively utilized Yeeflow to solve complex operational challenges and drive significant efficiencies.
Conclusion
By leveraging Yeeflow’s advanced features and following best practices for workflow optimization, businesses can create powerful automations that not only streamline operations but also adapt to changing needs. Remember, the goal of workflow automation with Yeeflow is not just to make processes faster but to make them smarter, more flexible, and more aligned with your strategic objectives.


